T H I S S I T E I S N O T A F F I L I A T E D W I T H M A C N N . C O M
![]()
![]()
![]()
![]()
![]()
![]()
![]()
![]()
![]()
![]()
![]()
![]()
![]()
![]()
![]()
![]()
![]()
![]()
![]()
![]()
![]()
![]()
![]()
![]()
![]()


![]()
![]()
![]()

![]()
![]()
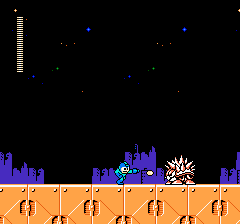
Name: Air Man
Creator: Dr. Wily
Number: 9
Weapon: Air Shooter
Height: 140 cm
Air Man prefers a simplistic attack, stand in one spot and let the tornadoes do all the work. Although Air Man's tornadoes are indestructable and can be difficult to dodge, you can work around them and knock the wind out of Air Man with Magnet Missiles or the Spark Shock.
Name: Crash Man
Creator: Dr. Wily
Number: 13
Weapon: Crash Bomber
Height: 132 cm
Whatever you do, don't let one of Crash Man's bombs explode on you, as it will cause a lot of damage to Mega Man. So, while avaoiding his Crash Bombs, toss a Hard Knuckle at Crash Man.
![]()
Porcupine
Ceiling Spikes
Blue Missile Springer
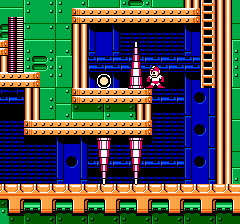
Parachute
Dragon Fly
Pogo Stick
Huge Hard Hat
Hard Hat
Hard Hat Helicopter
Cannon
![]()
Large Energy Pellet (2)
1-UP (1)
Energy Tank (1)
Large Weapon Pellet (7)
![]()
Shoot as fast as you can to get rid of the Porcupines quickly.

Avoid the Spikes.

This Spike is very tricky to get past. If you time your jump exactly it is possible to pass unscathed. But, if you do hit the Spike, Mega Man will be temporarily invincible so don't worry if you fall into the pit of Spikes.
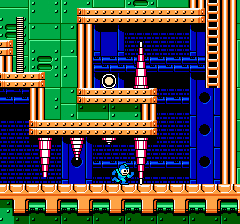
The timing for these Spikes is tricky. Study the pattern before venturing forth.
Unless you absolutely need it, forget about this Large Energy Pellet.

See the 1-UP up there? How the heck is Mega Man supposed to get that?

Use Rush Jet to fly over to this much needed Energy Tank.

Fall off the right side of the platform to get the 1-UP we saw a little while ago.

Get rid of this Porcupine before it has the chance to roll around. Once it starts rolling around there's no way Mega Man will be able to get to the Door without being damaged.

Air Man can only take a few hits from the Magnet Missile before he explodes. Remember that all of Mega Man's weapons will bounce off Air Man's tornadoes.

Spark Shock will knock the wind out of Air Man.

Use Rush Jet to fly over the void, and make sure to fill up often.

Jump out of the way of the Dragon Flies and shoot the Parachutes.

Don't worry about this Pogo Stick. Just climb up the ladder, move to the right, and it'll jump over you and fall right down the ladder.

Using the Needle Cannon on the Huge Hard Hat is a quick way to get rid of it. Watch out for the cannon balls and the Hard Hats that fall from the Huge Hard Hat.

These Hard Hat Helicopters can be very annoying. There are two strategies with them, try to shoot them, or just run by. The latter seems to work well.
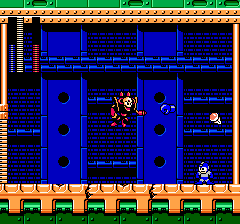
Crash Man is damaged by the Hard Knuckle the most, but it can be dificult to get them to connect. Don't let Crash Man's bombs explode on Mega Man.
![]()
Needle Man
Needle Man MIDI
Needle Man MOD
Needle Man MP3
Copyright © 1998-2000 David Bradbury
11054
Since January 1, 1999
Tuesday, 27-Jun-2000 21:23:11 EDT